机器学习-用本地摄像头做物体检测
- 物体检测作为机器学习的另一大应用,与图片分类不同,物体检测可以作用于同一张图片中的多个物体,并在检测时实时返回检测物体在图中的位置信息和置信度。而同为机器学习,则和图片分类一样都需要采集一定数量的图片用作模型的训练,而模型训练的好坏影响到最终识别结果是否准确。为了展示物体检测的效果,这里介绍基于本地摄像头的物体检测。在没有树莓派的情况下也可以通过电脑进行模型的训练。
准备阶段
- 首先,把USB摄像头模块连接到电脑上。(使用电脑自带摄像头也可)
登陆古德微平台后,按顺序点击更多功能——机器学习——基于本地摄像头的图片分类。

(图1)进入物体检测界面
注:基于本地摄像头的物体检测训练模型是使用本地的摄像头,如果在树莓派上打开网页进行训练那就是使用连接在树莓派上的摄像头。
训练模型
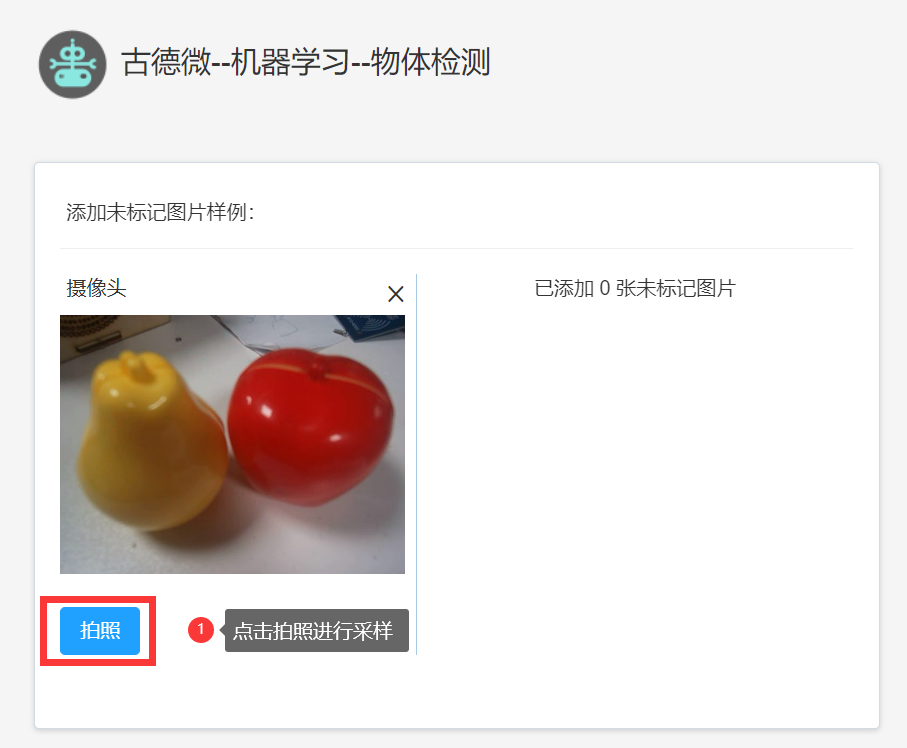
接下来开始训练模型,以“苹果”模型和“梨”模型为例。首先,进行图片采样和标注。将需要识别的物体放在背景下,再点击摄像头标志打开摄像头,点击拍照按钮进行采样(可以转动物体模型,多角度对物体进行采样,这样训练识别效果会更好,采样8-20张为宜)。

(图2)开启摄像头

(图3)拍照采样
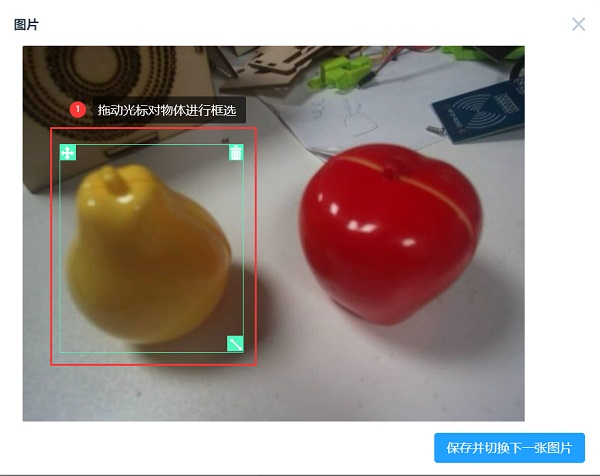
拍照采样完成后,开始对采样的图片进行物体的标注。

(图4)打开图片

(图5)框选物体

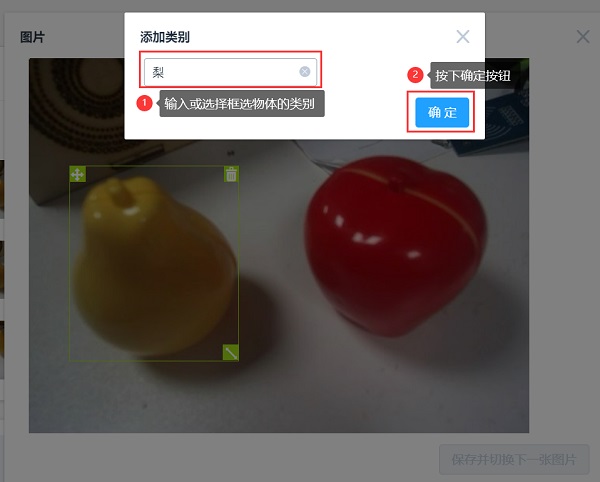
(图6)对物体进行标注

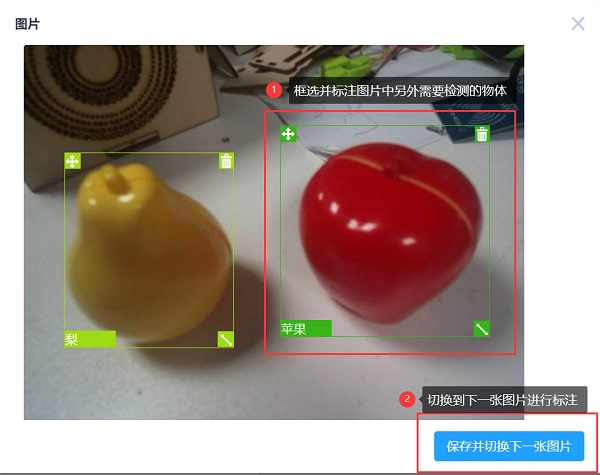
(图7)对所有图片进行标注
标注完成后,点击“开始训练”对样本图片进行训练。(训练需要一定时间)

(图8)开始训练
训练完成后右方可以查看效果预览,来验证训练模型识别的准确性。效果如下图:

(图9)模型效果预览
- 训练完成后点击下载树莓派上使用的模型,一共下载两个文件文件,
一个是后缀名为
.tflite的模型文件,一个是后缀名为.txt的标签文件。
(图10)下载模型
在树莓派中使用前面训练的模型进行物体检测
使用物体检测模型的简易案例
将上一步下载的模型文件和标签文件拷贝到树莓派(如何拷贝文件到树莓派),调用以下积木,即可进行图片分类。

(图11)物体检测实测
在加载物体检测模型的积木块中,分别输入要加载的模型文件和标签文件路径。将要识别的物体放在摄像头下,点击运行,在右侧调试区查看运行结果。
点击这里下载本案例代码。
物体检测模型应用案例:水果计价
- 案例简介:使用物体检测模型统计水果数量并计算价格。按下按钮,摄像头拍照并进行物体检测识别,根据识别结果分析图片中水果的数量,然后计算总价,并输出。
- 代码截图:

(图12)物体检测案例--水果计价
- 点击这里下载本案例代码。
物体检测python应用案例:水果检测
- 案例简介:使用python加载物体检测模型,在画面中显示检测的物体位置及置信度。
- 效果演示

(图13)物体检测python案例-水果检测演示
python代码
  import time
  import numpy as np
  import cv2
  from tflite_runtime.interpreter import Interpreter
  from PIL import Image, ImageDraw, ImageFont
  import _thread
  def load_labels(path):
      with open(path, 'r') as f:
          return {i: line.strip() for i, line in enumerate(f.readlines())}
  def cv2ImgAddText(img, text, left, top, textColor=(0, 255, 0), textSize=20):
      if (isinstance(img, np.ndarray)):  # 判断是否OpenCV图片类型
          img = Image.fromarray(cv2.cvtColor(img, cv2.COLOR_BGR2RGB))
      # 创建一个可以在给定图像上绘图的对象
      draw = ImageDraw.Draw(img)
      # 字体的格式
      fontStyle = ImageFont.truetype('/usr/share/fonts/truetype/wqy/wqy-zenhei.ttc', textSize)
      # 绘制文本
      draw.text((left, top), text, textColor, font=fontStyle)
      # 转换回OpenCV格式
      return cv2.cvtColor(np.asarray(img), cv2.COLOR_RGB2BGR)
  def annotate_objects(img, results, fps, textColor=(0, 255, 0), textSize=20):
      try:
          if (isinstance(img, np.ndarray)):  # 判断是否OpenCV图片类型
              img = Image.fromarray(cv2.cvtColor(img, cv2.COLOR_BGR2RGB))
          draw = ImageDraw.Draw(img)
          fontStyle = ImageFont.truetype('/usr/share/fonts/truetype/wqy/wqy-zenhei.ttc', textSize)
          for result in results:
              xmin, ymin, xmax, ymax = result['box']
              name = result['name']
              score = result['score']
              txt = f'{name} {score}'
              draw.text((xmin, ymin), txt, tuple(textColor), font=fontStyle)
              draw.rectangle([xmin, ymin, xmax, ymax], fill=None, outline = tuple(textColor))
          draw.text((0, 0), 'fps='+str(fps), tuple(textColor), font=fontStyle)
          return cv2.cvtColor(np.asarray(img), cv2.COLOR_RGB2BGR)
      except:
          traceback.print_exc()
          return None
  labels_path = '/home/pi/model/object_detection/labels.txt'
  model_path = '/home/pi/model/object_detection/model.tflite'
  g_threshold = 0.7
  labels = load_labels(labels_path)
  interpreter = Interpreter(model_path = model_path)
  interpreter.allocate_tensors()
  input_details = interpreter.get_input_details()
  output_details = interpreter.get_output_details()
  _, height, width, _ = input_details[0]['shape']
  try:
      cap = cv2.VideoCapture(0)
      while cap.isOpened():
          ret, origin_img = cap.read()
          imgWidth = origin_img.shape[1]
          imgHeight = origin_img.shape[0]
          new_img = origin_img.copy()
          new_img = cv2.cvtColor(new_img, cv2.COLOR_BGR2RGB)
          new_img = cv2.resize(new_img,(width,height))
          new_img = np.expand_dims(new_img, axis=0)
          if input_details[0]['dtype'] == np.float32:
              new_img = np.float32(new_img)
              new_img = new_img/255
          start_time = time.time()
          interpreter.set_tensor(input_details[0]['index'], new_img)
          # 开始预测
          interpreter.invoke()
          # 获取预测的结果
          boxes = interpreter.get_tensor(output_details[0]['index'])
          classes = interpreter.get_tensor(output_details[1]['index'])
          scores = interpreter.get_tensor(output_details[2]['index'])
          boxes = np.squeeze(boxes)
          classes = np.squeeze(classes).astype(np.int32)
          scores = np.squeeze(scores)
          # 设置识别阈值,剔除不好的结果
          results = []
          for i, score in enumerate(scores):
              if score >= g_threshold:
                  ymin, xmin, ymax, xmax = boxes[i]
                  xmin = int(xmin * imgWidth)
                  xmax = int(xmax * imgWidth)
                  ymin = int(ymin * imgHeight)
                  ymax = int(ymax * imgHeight)
                  result = {
                  'box': [xmin, ymin, xmax, ymax],
                  'name': labels[classes[i]],
                  'score': round(float(scores[i])*100,2)
                  }
                  results.append(result)
          elapsed_ms = (time.time() - start_time)
          fps = int(1/elapsed_ms)
          origin_img = annotate_objects(origin_img, results, fps, (0,255,0), 40)
          cv2.imshow("frame", origin_img)
          if cv2.waitKey(1) == ord('q'):
              break
  finally:
      cv2.destroyAllWindows()